Showing posts with label tutorial. Show all posts

Friday, April 27, 2012

Cosmetic Pads

 Like most women I use cotton balls in my personal care routine. I have recently started using witch hazel as a face toner in the evenings and my cotton ball consumption was ever increasing. This is not only a tax on the environment but also my pocket book. Now I know I am not going to save hundreds of dollars by not buying cotton balls, but I will save a few bucks which is better then nothing. In the past I used a few of my old baby receiving blankets to make tissues and they have worked wonderfully, so I thought I could also use receiving blankets to make cosmetic pads.

First decide on how big you want your pads. I just used a three finger width for mine.
Cut a strip from the blanket to your desired width.
Fold the strip into thirds. I made some in half, thirds, and fourths but I like the thirds best.
Cut the strip into squares. Each square will be made up of three pieces of fabric. Then cut each square into a circle by curving the corners. Cutting into a circle is not required but it makes sewing them together much easier.

Here is a picture of the blanket, the cut squares, and some cut circles. 

 Next using your sewing machine stitch together the three pieces of fabric. I use the over edge stitch which works quite well and does not use up as much thread as some of the tighter serge stitches.


 Cut off the excess thread and they are ready to use. To wash just throw them in with you regular clothes. If you are using them to remove something you fear might stain clothes be sure to wash them separately.


This is a really simple project and I am quite happy with the results. I will be making lots more for all of my cotton ball/cosmetic pad needs.

Wednesday, August 24, 2011

Fabric Gift Wrap

I made a vow a a couple of years ago that I would no longer spend money on wrapping paper. I have always saved every gift bag and piece of tissue paper to reuse. Currently though I have a few Christmas bags and a whole lot of baby girl and baby boy bags. I use these when ever I can but I need to find another solution to gift giving. For this reason I have been looking into reusable gift wrap. Most of what you find out there is bags. I think the reusable bags are great for birthdays but under my tree I still like the look of wrapped boxes with pretty ribbon.

I found a tutorial here that had some good information on making gift wrap. I thought I would get different fabric for each child so there would be no need to label the gifts. I knew I needed to make gift wrap not only for Christmas but also for the kids birthdays. This is when I thought why not make it double sided so one side is Christmas and the other side is for birthday. For those not interested in making gift wrap try Etsy there are many sellers of reusable gift bags and gift wrap there.

Here is my double sided gift wrap tutorial:

Making at least 3 sizes of gift wrap small, medium, and large in order to be sure you can wrap a variety of things. I also have 4 very large fabric bags which I use for extra large items. My smallest wrap is 12"x18" and my largest is 3'x4'.

First choose 2 different fabrics. I used a strawberry fabric and a plain red.
Lay out the fabric with the right sides facing each other.

Decide how big you want your gift wrap and cut about 1/2 inch more on each side. I did not use any precise measuring. I just eyeballed it and cut out different size squares and rectangles from the fabric I had.

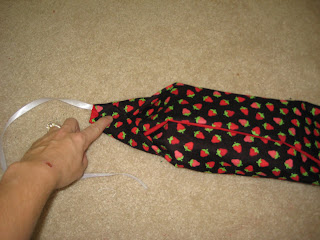
Fold the top layer of fabric in half. Place a ribbon about the length of the fabric across the bottom fabric where the top fabric is folded up. Pull a small amount of ribbon out beyond the fabric and fold the top fabric back down.

Pin the ribbon and the corners of the two fabrics together.
Sew around the fabrics leaving a small area not sewn in order to flip the fabric.

Flip the fabric so the right sides are out. Push out the corners as needed and then sew up the unsewn section.
You now have a completed fabric gift wrap.


How the wrap your gift.
Use the fabric gift wrap as you would paper. Lay it out and put the object you are wrapping in the middle. Fold up the sides without the ribbon.

Then fold in the corners and fold up the sides with the ribbon.

Depending on the size of the object you may be able to wrap the ribbon around to the front of the package or just tie the ribbon in the back.


This is the first tutorial I have ever written. If you have any question please post them below I will be happy to clarify anything confusing.

Here are a few pictures of our fabric wrap being used though the years at both Christmas and birthdays!


Wednesday, November 25, 2009

Celebration Flags

I wanted to make reusable fabric flags for my children's birthday parties. After looking at many different tutorials I made these.


I started by buying 4 different types of fabric. I went with a light blue, green, and blue and green plaid, and a pink. I bought 2 yards of each fabric. I also bought about 8 rolls of an off white 2 inch ribbon.
I then cut out a triangle from cardboard. I decided on the size I wanted my flags and then made my triangle 1/2 inch bigger on all sides. Using chalk I traced the triangle on the fabric.


I then used my pinking shears to cut the triangles out.


Next I place two of the fabric triangles back to back and sewed around the bottom two sides of the flag. Leaving the top open.


Flip the triangle rightside out. It is helpful to cut the bottom of the triangle before you flip it so that there is less fabric on the inside, this will make the bottom point sharper. Next iron the triangle flat.


Next I folded the ribbon in half and ironed it. I then cut it into 3 foot sections, this was just long enough to cover the top of three flags side by side with enough extra to tie to another strip. I then burned the edge so it would not fray.


Next I placed three flags in the fold of the ribbon and pinned them there. I sewed across the ribbon to attach the flags.


Finally I tied three sets of flags together and placed them across the fence in the yard.


A not on why I put three together at a time. After finishing the individual flags I decided to put them in groups of three so that I could change the color schemes as needed. I can connect green and blue, or pink and green, or any combination that went with the party theme.